Friday, November 29, 2013

Chocolate Chess Tarts

Hello everyone!

Did you have a good Thanksgiving?  One of the things I took to my family's Thanksgiving this year were these little scrumptious pies.  They are so easy to make and soooooooo good!  What I love about them is that everyone gets there only little pie.  


You will need these ingredients:


small pie shells, sugar, evaporated milk, baking chocolate, butter, vanilla and eggs

Combine chocolate, butter and evaporated milk in saucepan on stove.


Stir together and heat until melted.


Set that aside and let cool slightly.  

Then combine eggs and sugar in a large bowl.


Add vanilla and chocolate mixture from the stove.


Mix well and pour into a container that will allow you to pour this into the pie shells.


Pour mixture into pie shells and bake in oven.


After 30 minutes in the oven, they will be done. Remove and transfer to a cooling rack.


I actually doubled the recipe to make more pies, but this recipe should give you at least 12 pies or more!

Remove from pie tin and enjoy!


I cut into this one so you could see how decadent the chocolate is inside!


I have had this recipe for many years.  A friend gave it to me from the Southern Living Magazine.  So, maybe you can try it over the holidays this year too!

***************************************
Chocolate Chess Tarts

2 eggs
 5 oz can evaporated milk
12 unbaked individual frozen tart/pie shells
1/4 c butter
(2) 1 oz squares unsweetened baking chocolate
1 tsp vanilla
1 1/4 sugar

Combine chocolate, butter, and evap milk in small saucepan.  Cook over low heat until melted and smooth.  Let cool slightly.  
Combine eggs and sugar in a large bowl.  Add vanilla and choc mixture.  Blend thoroughly.  
Pour into unbaked pie shells.  Place shells on a baking sheet.  Bake at 350 degrees for 30 min.  Cool.

********************************************

Thanks for stopping by!

~ Dian Mayasari ~


Tuesday, November 26, 2013

What I've Been Up To

Hello Everyone!

Well, it's finally here!  Thanksgiving week is upon us.  I didn't realize how late it was this year.  It's already less than a month till Christmas!  Mercy, it's here fast this year.  I normally NEVER begin decorating for Christmas before Thanksgiving because I prefer to enjoy one holiday at a time, but since I wasn't hosting this year and Thanksgiving is late this year, I caved!  I will still wait to put up the tree and decorate the outside of the house afterwards, but I have begun other areas of the house.  I've been able to take my time and enjoy the process without feeling like I'm up against a deadline too, which is nice.  

My paper whites are slowly growing and it's fun to see how much taller they are every day.  


I've chosen a more rustic country theme to decorate the holidays with this year.  


Lots of red and white, greenery and pine cones and even a touch of plaid.


It's really helping to warm up the house with all the unpleasant weather we're having today too.  Are you having cold rainy weather at your house too?  

I will start baking some chocolate pies tomorrow and then a sweet potato casserole to take to my nieces house on Thanksgiving.  I'm looking forward to having a good meal and seeing my family.

Wishing you all a wonderful Thanksgiving (and keep warm)!

~ Dian Mayasari ~

Thursday, November 21, 2013

Decorating Candles

Hello everyone!

Brrrr!  Is it cold where you are today?  The temps have really dropped here in GA!  With this lag period between Thanksgiving and Christmas, I have been pondering how I'm going to decorate for Christmas this year.  I'm sure many people do that (here in blog land especially) and others just put things back up the way they did it years before.  We bloggers though like to change things up a bit though, don't we?  

One thing I saw somewhere was this little project.  Now I am not a big crafter.  If it isn't simple and inexpensive, I just don't do it.  But, I do love to make some things so that not everything in my house is store bought and mass produced.  I think it gives my decor a little something extra that way.  

So, this is what you'll need for this simple project.


Some pillar candles, old book pages, tape, twine and scissors.

Easy Peasy right?  You probably already have this stuff in your home too.

First tear or cut a book page down the center.


Then wrap it around your candle and tape it.  


Now, if your candles will be used so that all sides will be seen you'll need a large enough book page to wrap completely around it.  Mine will not be, so I'm not worried about it.

Here is what the front will look like.


Then, cut off a very long piece of twine and wrap it around the candle several times to get a thick band and tie it in a knot.  Cut off any extra.


At this point, you could add a charm or something interesting to it, but I left mine plain.  A sprig of greenery for Christmas would look cute tucked in the twine too.

Now, I've been playing around in my house trying to figure out my Christmas decor.  No!  I'm not setting up a tree yet and hanging lights.  Just working on basic stuff.  So, these candles will most likely be used in my Christmas decor this year.  Just sayin.


And there you have it!  It has that creamy vintage look I like so much.  

Are you planning your Christmas decor yet?

Thanks for stopping by.

~ Dian Mayasari ~

Tuesday, November 19, 2013

A Visually Inspiring Book

Hello everyone!

This past summer I purchased a book that I just had to share with you.  I remember after first receiving it how different it was from all others I had.  It was a nice thick hard bound book with sepia colored pages and the chapters were divided with a translucent style paper (like you see in formal invitations).  The lettering of the words printed on the pages was a mix of old fashioned typewriter style and hand-written versions.  

The book is about the lives of the owners of a store called "i gigi" located in England.  It's about how they met and the friendship they carry still today.  It showcases rooms from their homes and their store.


It also has some surprises in the book which I will show you at the end of this post.

Here are some beautiful photos from the book.


As I was flipping through the book, I noticed a couple of pages that had envelopes stuck to them.  It said there was a gift inside for me!


It turned out to be a little postcard with the image you see on the opposite page.


So I have two of these now!  

It's such a good book.  It's really more than just a home decor book.  I actually read the whole thing because it has a story of their friendship in it.  

So, if you get a chance, and you're out and about shopping for books, pick this one up and flip through it.  You'll see what I'm talking about.  It's a real visual treat!  

(I was not compensated in any way for this book or post.)

Thanks for stopping by!

~ Dian Mayasari ~

Sunday, November 17, 2013

Weekend Detour / Planting Paperwhites

Hello everyone!

I hope everyone in the mid west is doing OK.  I know you are all getting some  bad storms right now.  It has been ugly and rainy here all weekend long too.


It has also been very warm!  So strange for this time of year after we've been having such cold temps.  

The worst part of my weekend was being sick!  I caught a terrible stomach bug on Thursday that hit me hard for about 24 hrs.  Luckily, I'm much better now.  

I lived on this stuff for a  little while.


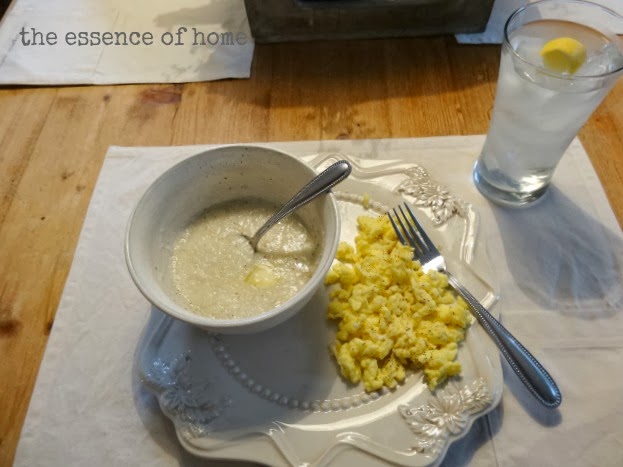
I graduated to something better this morning.  Scrambled eggs and grits!  (I sneaked in a smidgen of butter. shh)


But the weekend was not a total loss (unless you're counting the Ga Bulldogs game - Argh!) I did manage to do something that I had planned on all along, before I got sick.


Yep!  Paper white bulbs.  I bought them so I could force them to grow inside.  I've seen several of you ladies doing it already, so I decided to give them a try myself.  I have some fake ones, but think the real ones are so much prettier.

I planted one batch in this large galvanized tub.


They will stay in the kitchen.  My 12 yr old said it looked like I was growing worms!  LOL.

Then I separated the other batch in half and planted them in a silver container and a small galvanized container.


The silver one will probably go in the foyer and the other one I'll find a spot. 

I hope these grow well.  I've never grown them before but have heard it is very easy.  You just put them in soil and add a little bit of water.  Then hope the sun will finally shine to give them the other ingredient they need (unlike today).  I'll keep you posted as to how they do.  

Hope you are having a good Sunday so far and not in harms way of the storms out West of us.  

Stay safe!

~ Dian Mayasari ~

Thursday, November 14, 2013

Simple Things

Hello everyone!

I know many of you are gearing up for Christmas, but for me, I am still savoring the last few weeks of quiet time this Fall.  There will be plenty of time to get out the boxes of glitter and twinkling lights to decorate with for Christmas. 

So, for now, I'll just enjoy the simple things that fill my home.

Such as............ 

fresh smelling lavender


old books
 
 
matlesse and gingham
 
 
French pillows


Grey cabinets filled with my favorite white dishes


a rosemary topiary


blue and white plates


a Swiss cross pillow

 
old book bundles and white flowers


And a gentle reminder of the season.


Hope you are able to find time to enjoy the simple things around you today too.
 
Thanks for stopping by!

~ Dian Mayasari ~

Tuesday, November 12, 2013

Comfort Food on a Cold Night

Hello everyone!

Tonight is a cold one!  I think everyone here and around us are feeling some frigid air right now.  So, what better time than now to make a chicken pot pie for dinner and a Caesar salad.

This is a very easy recipe (my fave) and is very delicious.  This is also a meal that I've taken to a neighbor coming back from the hospital in the past.  You could say it is my "go to" meal!

Here are the ingredients you will need:


(cream of potato soup, canned vegetables, cooked diced chicken, milk, thyme, pepper, deep dish pie crusts, and an egg)

Combine all of the ingredients except the egg.


Mix them well and pour into a pie shell.


Put the other pie crust on top and crimp the edges together with a fork.  


Then brush the top of the crust with an egg.


Bake it in the oven for 40 min at 375 degrees.


It will come out golden brown and yummy inside!

Serve with a side salad.


Here is the official recipe:

*****************************************************
Chicken Pot Pie

1 can cream of potato soup (std size)
1 can Veg-all (drained)
2 c. cooked diced chicken
1/2 c. milk
1/2 tsp. thyme
1/2 tsp. pepper
2  9" deep dish pie crusts, thawed
1 egg (slightly beaten)

Combine first 6 ingredients.  Spoon into pie crust.  Cover with top crust and crimp edges with fork.  Slit top crust and brush with egg.

Bake 375 degrees  40 min.
****************************************************

Oh........and since it is a cold night and we have a fire going.  A little slice of German chocolate cake will do just fine as well.  


Come on over and I'll share it with you!

Thanks for stopping by.

~ Dian Mayasari ~

Linking to:  Wow-us-Wednesday