Wednesday, May 13, 2015

Share Your Style Party #13

Hello everyone!
Welcome to the 13th Share Your Style party!    I am Dian Mayasari from Dian Mayasari Style and I am your host this week. 


Remember that when you link up here, your link will also show up on 7 other blogs as well!  So, this is a BIG party!


Here are some features from last week.

Panoply shared a fun wedding party that took place in a barn.  I love country style weddings!  This one had lots of great ideas if you're planning your own too. 


Mia Bella Passions shared her recipe for raspberry white chocolate drizzle scones.  Oh my goodness, do these ever look good! 


One More Time shared how to make a farmhouse hall tree.  It's so cute!  I'm sure her family will get a lot of use out of that.


Gates of Crystal shared how she made French style shutters for her windows.  They are so pretty!  I love the blue color too.


Forever Decorating shared her new barn door installed in her garage.  I would love to have one of these somewhere in my own home!  Love this idea.


If you were featured, please add this button to your blog.


Now it's time for YOU to share your inspirations!  Be sure to provide a link back to this party on  your specific post.  I can't wait to see what you share!


Monday, May 11, 2015

My Painted Clock

Hello everyone!

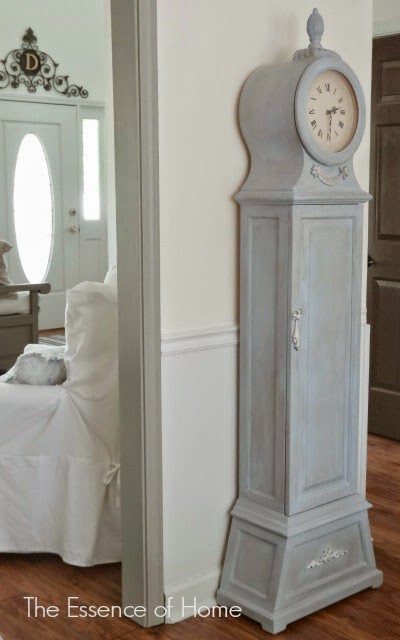
As promised, I am sharing the details to my painted clock.  I've had the clock for several years.  It was originally a cream color.  After changing my color scheme to mostly grey and white, I painted it grey.  It looked like this.


Then, I found this paint and decided to give it a try on my clock.  I just bought a sample pot so I wouldn't invest in more than I needed in case I didn't like it.


It states that no wax is needed, but I found that it was very unfinished looking without it.  So, I did use wax on mine.


The brand is called Farmhouse Paint.  Sample pots are $12 and quart sizes are $32.

I bought mine at an antique store.

Here is what it looked like after the first coat of paint was applied.


The color that I used was Blue Toile.  It looked too bright to me after just using the paint, so I decided to add a dark wax to it to achieve the aged look that I like.


Ah!  Much better.  The dark wax toned down the brightness.  I didn't sand any areas because I just didn't feel like it needed it.  Here is a close-up.


I'm loving this shade of blue compared to other one that I used last year on a few pieces of furniture.  This color is more of a true light blue rather than a turquoise blue.  


It helps pick up some other subtle blues in the room.  


It's nice to be able to make this easy change in just one afternoon!  If you want more info about this paint you can click HERE.

Thanks for stopping by!

~ Dian Mayasari ~


Friday, May 8, 2015

I'm Hooked!

Hello everyone!

There is a reason for this post.  But, most importantly, there is a reason for what you'll see IN this post.  The reason?  It's all because of this blog!  You see, Sally shared a fabulous find on her blog recently.  It completely swept me off my feet so I just HAD to go check it out further.  What was it that she found?  

This!


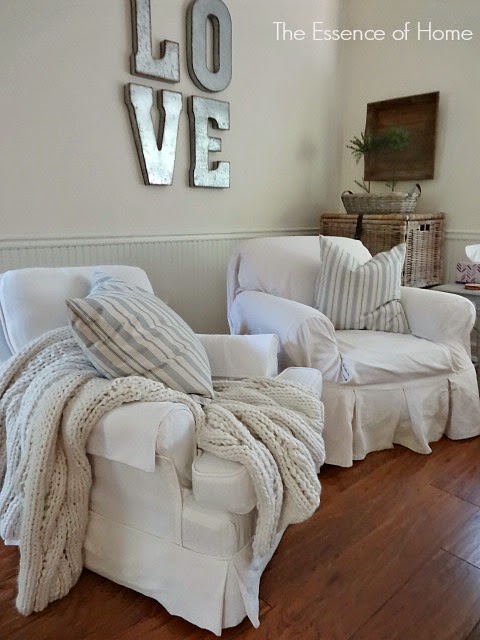
Yep!  It's a beautiful soft chunky cable knit throw in my favorite color.  But, the best part is that it was ON SALE!  She swooned me with her gorgeous pictures of it here.  And then I was HOOKED!  (pun intended.)    


Would it be possible to find one for me too?!


And the answer was YES.  Yes, there was one available for me too.

How could I resist all of this chunky cable goodness?


So, Sally, if you're reading this...........this is ALL your fault!  


You tempted me with your gorgeous pictures and charming home displaying this amazing new throw. 
 It's....all...your...fault!!!


And for that..............I thank you!!  

Find a throw for yourself here (before they're all gone).

Visit Sally's blog here.

Oh, and for those of you who cringe thinking of buying a throw during warm weather, you'll think twice once you see how much money you save buying it out of season.

Hope all of you have a WONDERFUL Mother's Day weekend!

Thanks for stopping by.

~ Dian Mayasari ~

Wednesday, May 6, 2015

Share Your Style Party #12

Hello everyone!

Thanks so much for stopping by the party tonight!  Now that Spring is in full swing, I bet you have lots of great projects and inspiration to share.  I can't wait to see what you have for us this week!  Lynn, from the Vintage Nest is your host this week.


Welcome to Share Your Style Party #12.   

 So happy to have you here today and see your inspiration for us.   I hope you can take some time to visit other party goers and your hosts, gather some new ideas or just delight at the photos and make new friends.   I am Lynn, of the Vintage Nest blog, your hosting host today and here are your other blogger host. :)


Sharing just a  little bit of my style today. :)  This past weekend, I, along with several other ladies, had a big booth at The Vintage Home Market in Richmond, Va.  It's a lot of hard work, but, oh my, the new friends you meet, new prospects, new followers, and sharing my style for the love of vintage is so much fun.  We had a blast.  Maybe we'll see you at the Christmas show. :)


as always,  "picking" a few Share Your Style posts is a very hard thing to do. They are all so wonderful, but one colorful photo caught my eye right away and since I love strawberries, they are one of the best fruits for you, and it's strawberry pickin' time, I'd like to share Pam of Everyday Living 's field trip.  Great photos and recipes Pam! 


~~~~~~~~~~~
Penny, of Penny's Vintage Home, shared a potting table that knocked my socks off.  Picked up at a yard sale, she transformed an old table to a thing of beauty for her back yard.  Go see!


~~~~~~~~~~~~~~~~~

Julie, of Little Farmstead,  showed us her arbor that sets the entrance to her property.  It's so pretty, and now that Spring is here, it's covered in gorgeous greenery and twinkle lights.  


~~~~~~~~~~~~~~~
A little Spring DIY project was the subject of Maria of Home Away From Home's post last week.  Full of fresh cottage farmhouse charm, it's inexpensive and simple to make.  You will love it!


If you were featured today, we would love to gift you this "feature" blog of SYS and wear it on your blog. :)


 And please Make sure to have a link back to Share Your Style somewhere in your post.  

SO LET'S GET THIS PARTY STARTED 


Tuesday, May 5, 2015

How to Make Homemade BBQ on the Grill

Hello everyone!

With the warmer weather finally upon us, I hereby declare it "grilling season"!  One of my family's favorite things to eat is barbecue sandwiches.  My husband loves to grill out and last Sunday smoked a Boston Butt on our Weber grill all day in order to make barbecue sandwiches that night.  Yum!  Here are the instructions if you would like to give it a try.


You will need the following to get started:

A grill or smoker with a thermometer on it.
charcoal briquettes
wood chips/chunks (made for smoking meat)
meat thermometer
meat rub seasoning
heavy duty aluminum foil
aluminum pan
meat - Boston Butt


You will need to begin this prep a day ahead of time.

Rinse and pat dry the meat.


Apply the rub to the meat 12-24 hrs prior to grilling.


We used this rub.


Wrap the meat in plastic wrap and place in refrigerator overnight.

Prepare your wood chips/chunks  by soaking them in water overnight as well.


We used hickory.


The next day, you can begin grilling the meat.  Actually, you will be smoking this meat on the grill.  You'll need an early start since the meat will need to cook for several hours.


Place a small aluminum pan filled with water or apple juice under the grill grate directly under where the meat will be placed. We used water.  This will keep the meat from drying out.

On the other side of the grill place charcoal briquettes and get them hot.

Add some of the wood chips/chunks that have been soaked in water on top of the charcoal briquettes.

Place the grill grate over all of that.


Then add your meat on top of the grate, on the side that does not have the hot coals, over your pan of water.

Close the lid to start the smoking process. You can open the vents on your grill cover, slightly, to help regulate your grill temperature too.

Try to keep the grill temp (located on top of the cover) at 250 degrees.  If it starts cooling down you'll need to add more charcoal and wood chips to give it more heat.  You will notice a lot of smoke coming from your grill during this process and that is what you want!


After about 6 hours of cooking, your meat temp should be at 160 degrees.  You'll need to use your meat thermometer to check that.  It will look burned , but trust me this is the way it is supposed to look.


Once your meat has reached that temp, remove it from the grill and wrap it in heavy duty aluminum foil.  This will help maintain moisture in the meat.

Place the wrapped meat back on the grill and close cover.


  Continue cooking for another 2 - 3 hours until your meat reaches 190 degrees.  (Use your meat thermometer for that.)

Once your meat has reached that temp, the cooking process is over.  Now it needs to rest.  You will need to place it in an empty cooler for another 2 - 3 hours.  It can stay wrapped during this resting period.

Once it has rested, unwrap the meat and place on a platter. (Don't panic that it looks so black.  I did too.  This is normal.)


 Grab another platter and begin pulling apart the meat with a large fork.  You want to separate the meat from the fat basically.


To serve:  place shredded meat on hamburger bun with heated BBQ sauce on top.

Voila!  Ready to eat now!


Sorry that I didn't have pictures taken for every detail.  If you have any questions, please let me know and I'll be glad to answer them.  I hope that you'll give this a try over the summer.  It's really good and your neighbors will all want to know what you're cooking!  It smells heavenly.

Thanks for stopping by!

~ Dian Mayasari ~

Linking to:  Wow-Us-Wednesdays
Tweak it Tuesday

Monday, May 4, 2015

Weekend Recap

Hello everyone!

How was your weekend?  I hope you had a good one.  Mine was really wonderful.  Why?  Because my whole family was together and we celebrated a birthday, and did projects around the house and cooked some great food.  Oh, and did I mention that it was the prettiest outside that's its been in weeks?  So, I just had to share a few photos of our fun weekend.

On Friday, I did a little shopping and found some pretty blue paint (that I will share with you in another post).  I decided to buy a sample pot and paint my clock with it.  


I will show you more about this project in another post.

On Saturday, we celebrated my son's birthday.  His birthday was actually on Sunday though.


He turned 14.

On Sunday, my husband smoked a Boston Butt all day on the grill.


We love eating homemade barbecue!  He cooked a huge one and it gave us enough to even share with our neighbors.


I will share the the instructions for cooking this in another post.  I must say it was just as good as any that I've had at a restaurant!


Amidst the cooking on the back deck, deconstruction of the swing set in our back yard has begun.


My boys are too old for it now and it was starting to look bad.  We plan on building a nice fire pit in place of it this summer!  Can't wait for that!

Be sure to check back with me later this week for more info on the painting project and the barbecue.

Thanks for stopping by!

~ Dian Mayasari ~

Friday, May 1, 2015

Morning Sunshine in the Dining Room

Hello everyone!

This weekend is going to be beautiful here in Georgia.  No more rain and lots of sunshine and warm temps are finally here!  It will be a busy weekend here too.  Tomorrow, we'll be celebrating my youngest son's 14th birthday.  We'll also be celebrating Mother's Day (early) with my MIL.  On Sunday, my husband is planning on grilling all day (which I'll share with you).  It is one of our favorite things to eat and it has to cook all day.  Yum!  Be on the lookout for that soon.  

In the meantime, I wanted to share some of these rays of sunshine shining in my dining room today.  It gets the most sun of all of my rooms.  


In the center of my dining table, I placed this wooden pedestal (that I finally found).  I placed some white hydrangea flowers in a glass jar and voila!  Instant centerpiece!


I moved my glass demijohn crate in here too.


And there's one thing I can count on every morning..............


This is where you'll find Max.  He loves lying on the warm floor in the sunlight.  

Hope you all have a great weekend!

Thanks for stopping by.

~ Dian Mayasari ~

Linking to:  Best of the Weekend